


ADVERTISEMENT
Ask the Clinical Instructor
We have diagnostic cardiologists who perform the angiograms and find a blockage. Their partners often cannot come back and perform the intervention for several hours. When they come to perform the angioplasty, we have debates about the best way to exchange sheaths and maintain sterility. Any suggestions?
— Anonymous, through www.rcisreview.com
Yes, this can be problematic. I will present one way of accomplishing this below. As with many things that we discuss in this forum, there are different ways to do the same thing. I encourage all of you to send pictures and explanations of “your way,” which I can include in future articles.
This process is what I was taught when I started, and has evolved somewhat over the years.
First, we will assume that the first sheath used in the diagnostic portion of the procedure is properly secured with sutures and ‘packed’ with a low concentration of saline/heparin solution, or whatever your protocol is at your facility.
There is no way around the fact that the sheath that was used for the first part of the procedure is contaminated, and should not be used for the second part. Because of the contamination, we would not want to introduce microorganisms or other contaminates into the bloodstream. Even if you carefully cover the sheath with a dressing/bandage, you should consider it contaminated.
Our goal is to have a sheath exchange in which we keep it as “clean” as possible. In many places, this should be completed in as much of a sterile fashion as possible.
Again, these steps are one recommendation of how to accomplish this: [Note: Since these photographs are ‘simulations’, there are times when you would have to suspend disbelief. Not everything can be identical in a simulation.]
 When the patient is brought back to the procedure room, remove the bandage/dressing and remove the suture. Assuming a right groin placement, try to have the hemostatic valve/port off to the midline of the patient. This will be an important part of an upcoming step. Change your gloves before moving on to the next step.
- Next, utilize a cleansing agent to clean the sheath and the surrounding skin around the sheath. In this case, betadine is used. A Chlorhexidine
 sponge (i.e.; “hibiclens” or “Chloraprep”) can be used, but my experience is that the alcohol causes patient discomfort at the puncture site. I have also seen the hand scrubs (Chlorhexidine, betadine, etc.) sponges utilized as well. There are many options, and you should utilize whatever option may be appropriate at your facility. If you use betadine or Chlorhexidine, remember to “circle out” and you will need to wait for it to dry before proceeding (Figures 1-2).
  At this point, change your gloves again, as they will be considered contaminated.
- Apply the drape to the patient as you normally would, without touching the sheath. You will have the hemostatic valve/port under the drape medial to the sheath itself. You should not have to touch the sheath any more in the exchange prep process.
- If you normally place towels, clamps, etc. on the drape at this point, do
 so as you would for any other case. Just don’t touch the sheath. You will be placing another drape before proceeding with the sheath exchange.
 - Place four towels in a square around the sheath. You can make it as close to the fenestration as possible, as this will aid in the removal of the contaminated items later (Figure 3).
- Place a small drape over the squared towels that you just put into place. We
 utilize a brachial drape with a smaller fenestration on it (Figure 4).
 - After the drape is placed, take a sterile pair of hemostats, and clamp the hemostatic valve line as shown. Be careful NOT to touch the sheath itself (Figure 5).
- Place all needed materials for the sheath exchange on the last drape. All materials needed must to be within the reach of the operator, to maintain the sterility of everything else.
- Now the sheath is ready for exchange, either by the physician, or as
 your protocols may allow, another healthcare provider. Whoever will do the exchange will contaminate their gloves and will need to remember that at the end of the process. Assistants will not be touching anything contaminated, and may maintain sterile technique through the process.
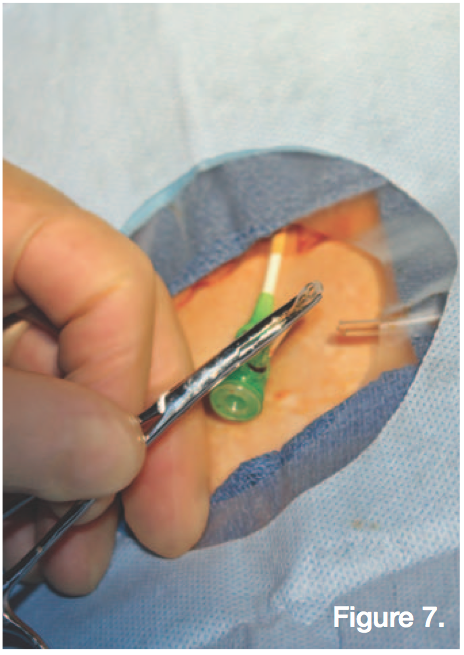
 - Whoever will be exchanging the sheath will cut the sheath tubing DISTAL to the hemostat (Figures 6-7).
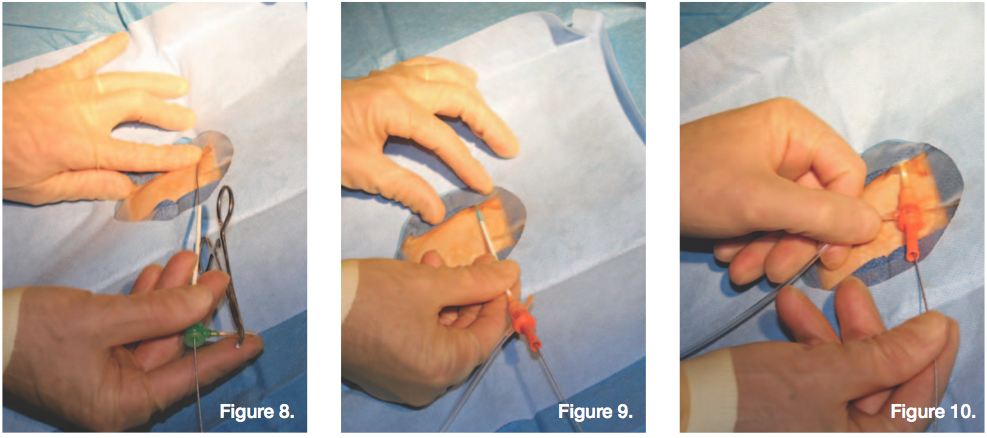
- At this, the wire can be placed in the sheath, and the sheath exchanged
 (Figures 8-10).
 - The protruding hemostatic valve line that was previously cut should now be tucked underneath the drape. This can be removed after the procedure.
- After the sheath is exchanged, the operator should remove their gloves and place it on the drape last applied. HINT: Sometimes it is easier to double glove instead of taking gloves off and having to put a new pair on.
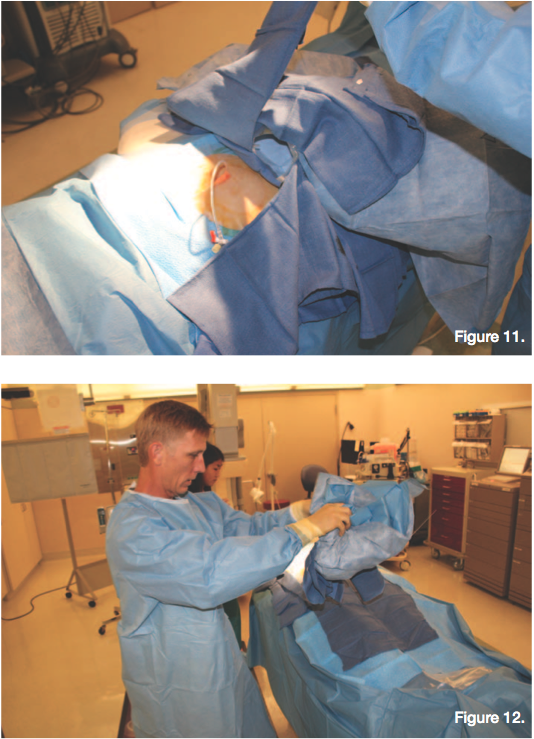
 The “sterile” assistant will then fold up the small drape and supplies without actually touching the supplies. The underside outer edges of the small drape placed will still be sterile and ‘touchable’ (Figures 11-12).
 - At this point, the new sheath may be flushed and the procedure begun as normal.


Again, this is just a representation of one way of performing such a maneuver. If you, or your facility, has a different process for accomplishing this task, please consider sending pictures and a description, and I will include “your way” into a future issue. You can submit the information to tginapp@rcisreview.com.
